Joong-Gun Pattern – Preview & Insights
About Joong-Gun
Joong-Gun is named after the patriot Ahn Joong-Gun who assassinated Hiro-Bumi Ito, the first Japanese governor-general of Korea, known as the man who played the leading part in the Korea-Japan merger. There are 32 movements in this pattern to represent Mr. Ahn’s age when he was executed at Lui-Shung prison (1910).
Key Technical Insights from GM Paul McPhail
Drawing from my ongoing study and technical work within ITF Taekwon-Do, each pattern in this Hub includes a short set of key technical points — practical reminders practitioners often overlook. These notes are personal insights and are not official ITF Technical Committee statements.
Key Technical Points
- Movement 3. Palm upward block: Finishes at solar plexus height.
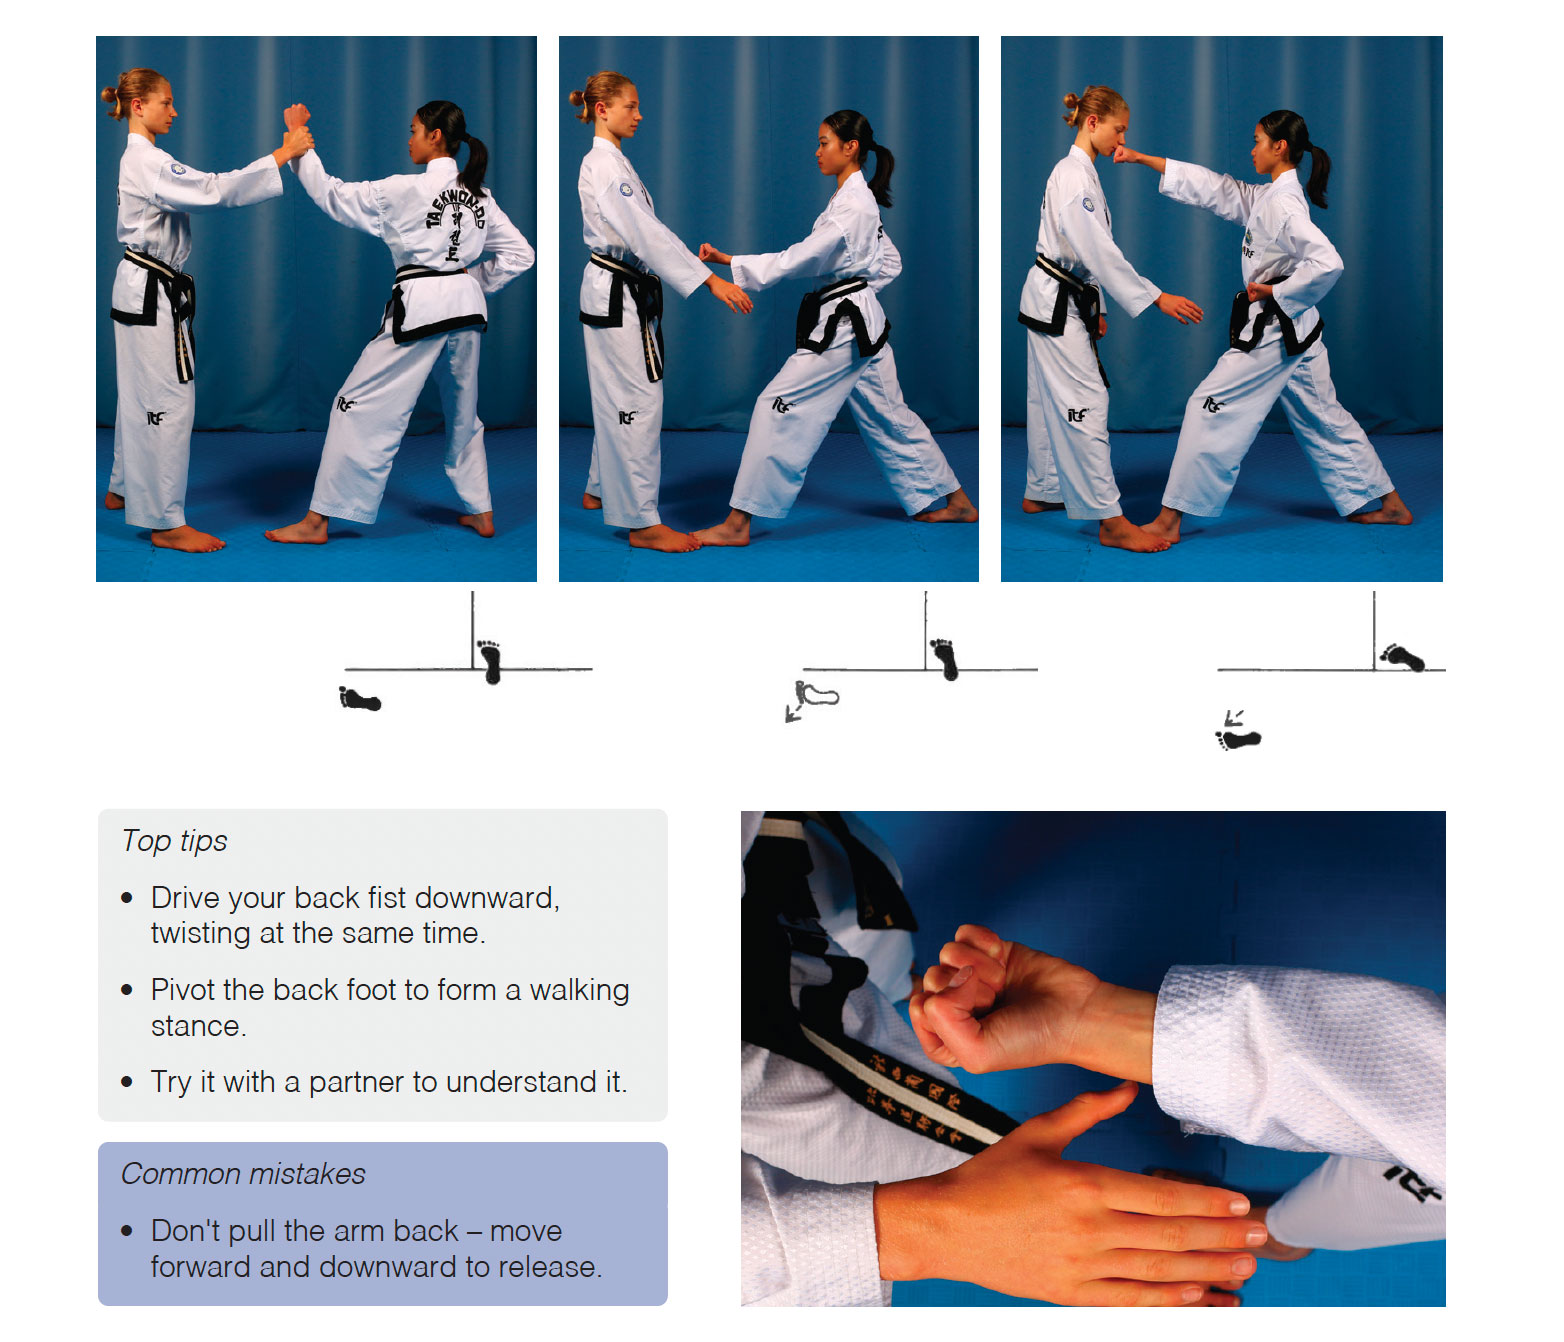
- Movement 8. Upper elbow strike: No arm rotation for this movement, just natural backward motion.
- Movement 11. Twin fist vertical punch: Arms bent 40 degrees. Starts in front of shoulders.
- Movement 12. Twin fist upset punch: Punch slightly up so your knuckles can arrive at the target. Fists finish in line with the shoulders.
- Movement 13. X-fist rising block: Block is circular (circle in front of the body) and the X-fist crosses in front of solar plexus before rising.
- Movement 27. Pressing block: Bottom arm is almost straight – further back than top hand and on the shoulder line. The top arm bends about 35 degrees on the chest line.
- Movement 30. Angle punch: slightly lower than shoulder.
- Movement 31. U-shape block: Bottom hand is in slightly to line up with top hand. Bottom hand slight higher than the elbow.
- Movement 15 and 18. Application: This is to defend against an opponent who tries to grab your wrist and pull you forward. You release by twisting your arm downward, leveraging the movement to force the opponent’s thumb open and free your wrist. The counter-attack is a high punch in fast motion. A releasing motion is used to escape from a grab, normally by pushing rather than pulling, to make use of the opponent’s momentum. Breathing is normal but there is no sine wave.
Training Suggestions
- Break the pattern into short sections and repeat each section slowly before joining them together.
- Use video review to check technical accuracy — then compare your movements with the tuition given in the premium video.
- Occasionally perform the pattern at a slightly slower pace to feel the weight transfer and breathing rather than chasing speed.
Teaching Ideas for Instructors
- Emphasise clear preparation and finishing positions for each technique.
- Have students maintain correct stance length and width as this pattern constantly changes between walking and L-stances.
- Teach the changes of rhythm deliberately — some movements should be sharper and quicker, others more measured and controlled.
- Reinforce correct tool selection (reverse knifehand, palm, upper elbow) and the correct line for each technique.
Background & Interesting Details
- As a child, Ahn Joong-Gun was interested in martial arts and marksmanship. He became active in the Korean independence movement and is remembered as a symbol of resistance against Japanese occupation. He was jailed for five months, tortured, then executed by hanging at the age of 30.
- One of Japan’s leading statesmen, Hiro-Bumi Ito, travelled to Korea in 1905 with a letter from the Emperor of Japan to be signed. It was a “Protectorate Treaty” that formed part of Japan’s long-term plan to occupy Korea. To pressure the Korean government, Ito surrounded the Imperial Palace with Japanese troops until the ministers finally signed. Ito was then named Resident-General of Korea and given total control of the Japanese forces stationed in the country. The Treaty also gave the Japanese the right to buy land from Koreans at reduced prices and, in many cases, land was simply taken from them.
- By this time, Ahn Joong-Gun had exiled himself to Russia and joined a resistance group of around 300 men. In 1909, along with 11 others, he formed an Independence group, with each member cutting off their ring finger as a sign of commitment to their cause.
- Because of the increased Japanese presence in Kando (in China), Russia became uneasy. A meeting was arranged there between the Russian finance minister and Hiro-Bumi Ito to calm Russia’s fears. When Ito arrived at the railway station, Ahn Joong-Gun was waiting. He slipped past the Japanese guards and shot Ito three times as he stepped off the train, also seriously wounding four other Japanese officials. As he expected, he was immediately arrested by the Russians, who then handed him over to the Japanese authorities.
Frequently Asked Questions about Joong-Gun
- What grade is Joong-Gun for?
Joong-Gun is required at blue belt (4th gup) level in ITF Taekwon-Do. - What are the most common mistakes in Joong-Gun?
Not arriving back on the spot. This normally happens due to inaccurate stance lengths. - How should I introduce Joong-Gun to new blue belt students?
Start by teaching all the new movements – and there are plenty in this pattern. Once the new movements are mastered, teach the pattern sequence.
Full Joong-Gun Breakdown
The full, in-depth breakdown of Joong-Gun is available for TKDCoaching Premium Members. In this session GM Lan covers detailed coaching points, corrections, common mistakes, and teaching progressions you can use in your own classes.
👉 Watch the full Joong-Gun breakdown video (Premium)
More TKD Patterns and Resources
TKD Patterns Hub – patterns and instructor-focused insights
Explore more pattern previews and coaching notes for all 24 ITF tuls.
Related pages:
Insights on All 24 Patterns by GM McPhail
Favourite Pattern Survey – we’d love to know what you think
For deeper work on Joong-Gun and related techniques, explore our other courses and breakdowns inside TKDCoaching, including detailed sessions on patterns, as well as dedicated kicking and footwork modules that support the demands of this pattern.
Full breakdowns for all 24 ITF Taekwon-Do patterns
are available to TKDCoaching Premium Members.
Become a TKDCoaching Member
If you find these pattern insights helpful, you’ll love the full TKDCoaching library. Premium Members get access to complete breakdowns, instructor courses, warm-ups, sparring sessions, self-defence modules and much more.